

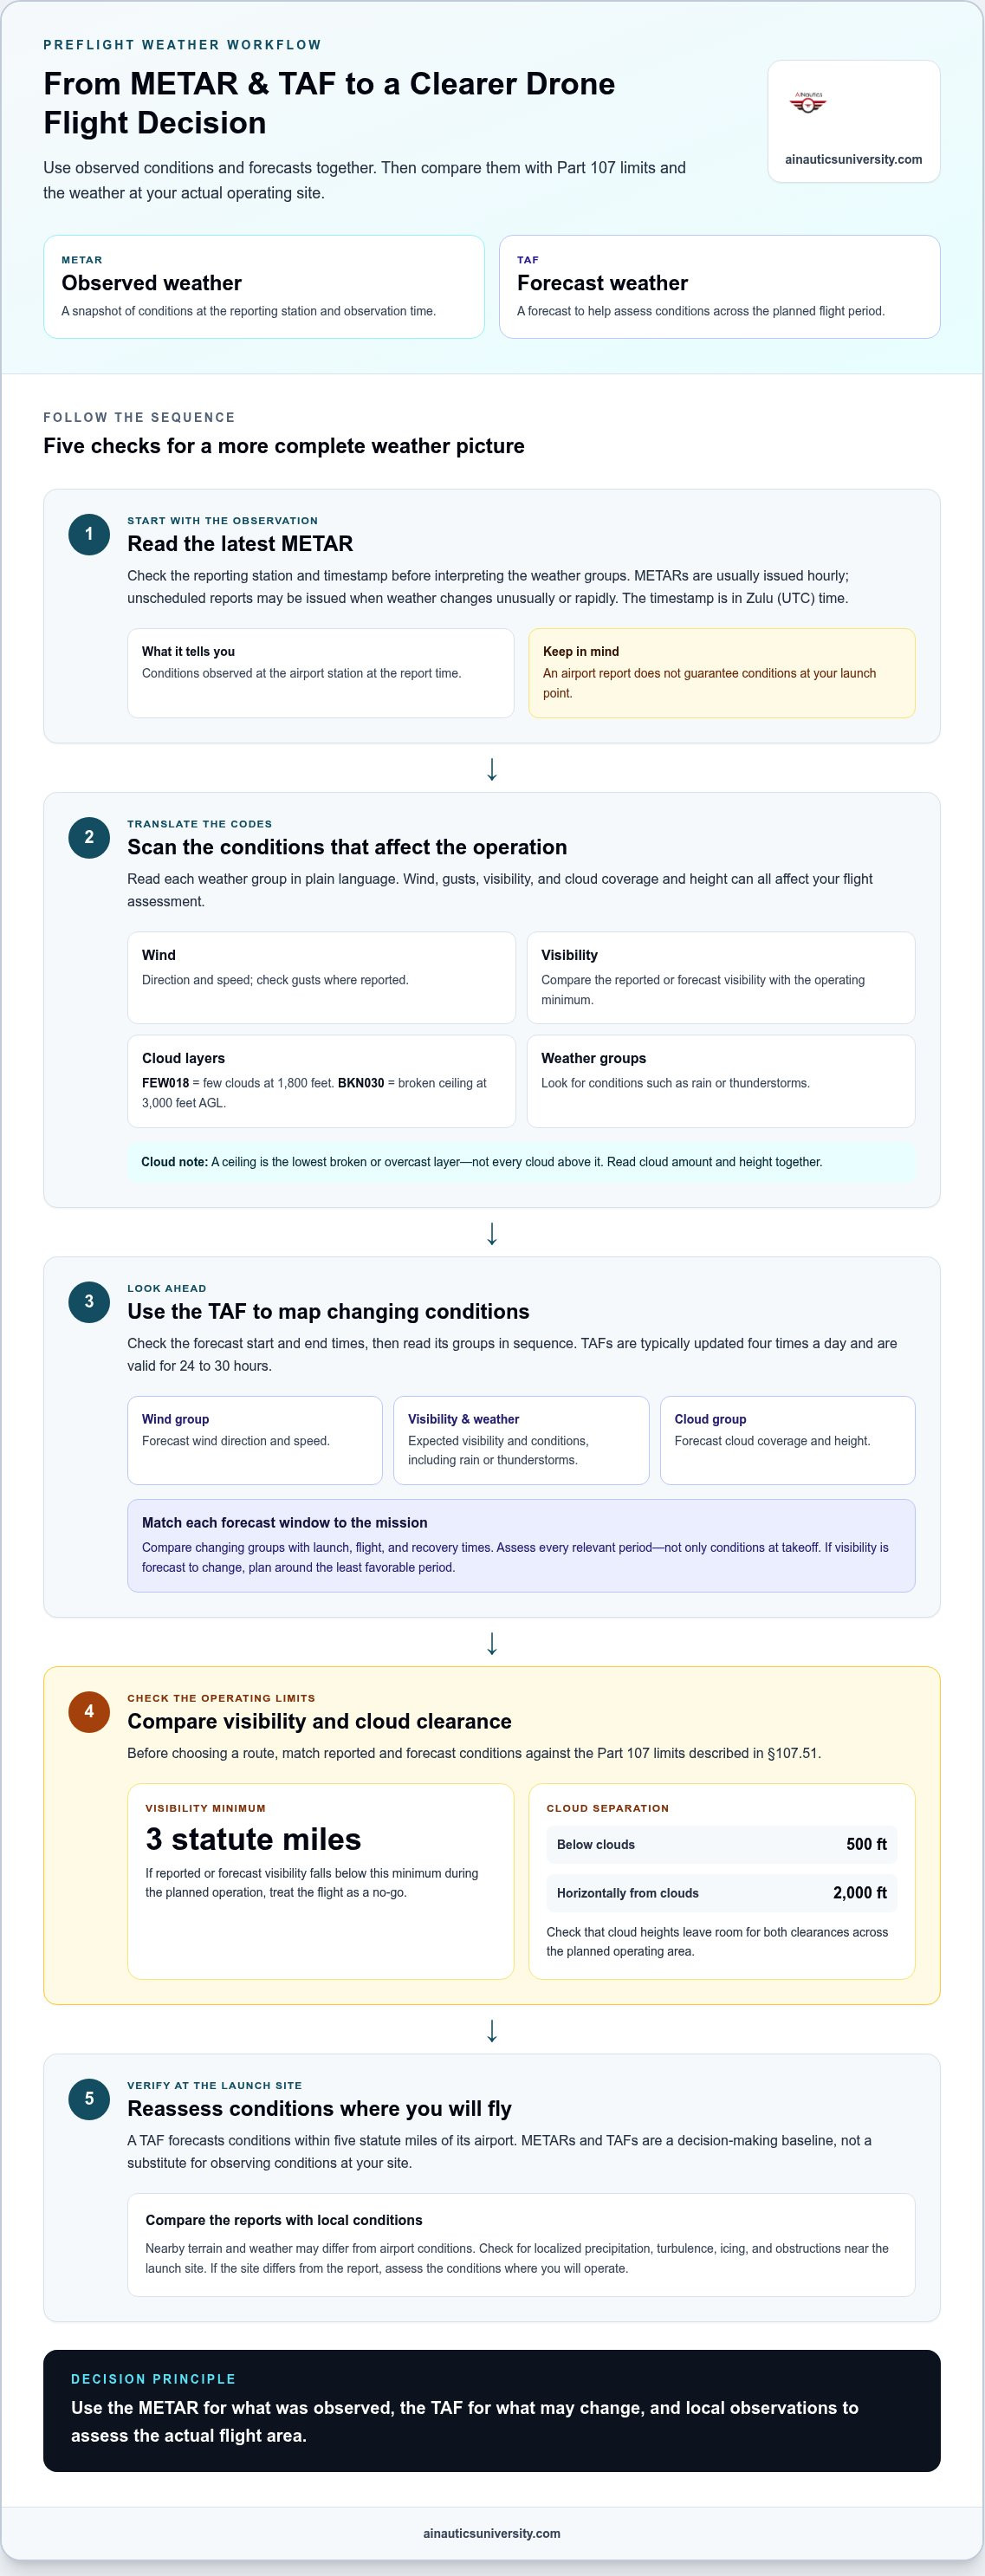
A forecast can look flyable while current conditions tell a different story. METAR and TAF for drone pilots serve different purposes: a METAR reports observed weather, while a TAF forecasts conditions. Under FAA Part 107, pilots must maintain at least 3 statute miles of visibility; according to the Federal Aviation Administration, §107.51 also requires operations to remain at least 500 feet below clouds and 2,000 feet horizontally from them.
That distinction matters when deciding whether to launch, continue, or adjust a drone flight. Learn to decode the weather details that matter most, including wind, gusts, visibility, and cloud ceilings, then apply them to practical flight decisions. These examples show how to move from unfamiliar codes to a clearer preflight weather assessment, using observations and forecasts together rather than treating either as a complete picture.
Key Takeaways
- Use observed conditions and forecasts together to build a more complete preflight weather picture.
- Learn to scan weather codes for the details that can affect a drone operation, from wind and gusts to cloud ceilings.
- Turn METAR examples into practical decisions by translating each code into plain-language conditions.
- Build confidence with weather interpretation as part of your Part 107 learning and flight-planning skills.
What METAR conditions ground a drone under §107.51?
METARs and TAFs help you assess conditions, but they describe airport weather, not every launch point. They’re useful for planning local flights when you compare the reports with conditions at your actual site.
- Start by comparing reported visibility with the legal minimum. According to the Federal Aviation Administration, Part 107 requires drone pilots to maintain at least 3 statute miles of visibility during operations. A TAF group can show visibility forecast for a future period, while a METAR reports observed conditions. If reported or forecast visibility falls below that minimum during your planned operation, treat the flight as a no-go. If visibility is forecast to change, plan around the least favorable period, not only the conditions at launch.
-
Compare Conditions With Flight Limits
Match the forecast and observation against the flight limits before choosing a route. According to the Federal Aviation Administration, §107.51 requires operators to remain at least 500 feet below clouds and 2,000 feet horizontally from clouds. Check whether cloud heights leave room for both clearances across the planned operating area. Avoid planning a route that depends on slipping close to a cloud edge as conditions shift.
- Decode the TAF groups that affect the timing of your flight. Wind groups describe forecast wind direction and speed; visibility groups show forecast visibility; weather groups identify conditions such as rain or thunderstorms. Cloud groups indicate coverage and height. Read each group for the forecast time window it applies to, then compare changing groups across the mission period. A forecast of 3 statute miles during thunderstorms with rain signals a different operating picture from a period with better visibility and no listed weather.
-
Assess Cloud Coverage and Height
Read both the cloud amount and the height instead of treating a cloud code as one condition. FEW018 means few clouds at 1,800 feet; BKN030 indicates a broken ceiling at 3,000 feet AGL. A sample forecast also shows scattered clouds at 1,000 feet AGL. Compare the lowest relevant cloud layer with your route and required clearance. A ceiling describes the lowest broken or overcast layer, not every cloud above it.
- Use the reports in sequence. First, read the METAR for observed airport conditions, then consult the TAF for expected changes during your flight. A TAF forecasts conditions within five statute miles of the airport, so it may not capture every local feature around your launch site. Reassess conditions where you’ll operate, especially if terrain or nearby weather differs. METARs and TAFs provide a decision-making baseline, not a substitute for observing conditions at the site.
What Is a METAR Report?
Use a METAR to understand observed weather and a TAF to anticipate forecast conditions. Compare both timelines with your planned launch and flight period.
- Check the METAR timestamp before interpreting its weather groups. METARs are usually issued hourly, and unscheduled reports may be issued when weather changes unusually or rapidly. The timestamp gives the day, hour, and minute in Zulu, or UTC, time. Match it to your local flight plan before treating the observation as current. A METAR describes conditions at the observation time, not a guarantee of conditions at your launch point.
- Use the latest TAF to plan for conditions that may change during your mission. A TAF forecasts weather for a future period, while a METAR records an observation. TAFs are typically updated four times a day and are valid for 24 to 30 hours. Check the forecast’s start and end times first. For example, a sample forecast runs from 1500 UTC on December 26, 2024, to 1500 UTC on December 27, 2024.
- Read TAF groups in sequence, then match each time window to your schedule. The wind group describes forecast wind direction and speed; visibility and weather groups describe expected visibility and conditions. Cloud groups report forecast coverage and height. Compare groups across the forecast period instead of reading only the opening conditions. A change in the forecast wind or weather can affect your assessment as the planned operating time approaches.
- Identify change groups and note when each forecast condition applies. A TAF can include temporary or changing conditions, so don’t assume every line describes the entire forecast window. Mark the times attached to each group, then compare them with launch, flight, and recovery. If conditions are forecast to change during the operation, assess each relevant period, not just the one that matches takeoff.
- Pair observations with forecasts when planning a longer mission or multiple flights. Start with the latest METAR, then use the TAF to anticipate later changes. A TAF forecasts conditions around its airport, while a METAR records an observation at the reporting station. Treat the reports as complementary: one tells you what was observed, and the other helps you plan for what may come next. Revisit them if your schedule changes.
What is METAR and what does it tell a drone operator?
Use a METAR as a structured weather snapshot, then interpret its groups in the context of your planned operation. For METAR and TAF for drone pilots, the key skill is connecting coded observations to decisions, not simply reading a decoded summary. Beyond these reports, assess localized precipitation, turbulence, icing, and obstructions near the launch site.
-
Check Report Times and Frequency
Identify the reporting station first, then decide whether it represents your operating area. Airport observations describe conditions at that station, while nearby terrain and weather can differ. Compare the observation time with what you see on site. If the sky or wind at your launch point differs from the airport report, base your assessment on local conditions rather than assuming the station reflects the entire area.
-
Decode the METAR Structure
Separate the report into groups before decoding individual codes. The International Civil Aviation Organization standardizes the METAR format globally, giving pilots a consistent structure to recognize. Identify the station identifier, observation details, and weather groups, then interpret each by its position and code. This helps prevent confusing a cloud layer with a visibility or present-weather entry when scanning a compact report.
-
Interpret Weather for Drone Flights
Connect each group to a specific part of your flight plan. Wind information affects route exposure; visibility and cloud groups describe conditions you’ll operate in. Weather codes may also signal precipitation or other hazards relevant to launch and recovery. Consider what each condition means for your location and timing, then adjust your operating area or schedule if the overall picture no longer supports the plan.
- The Aviation Weather Center provides METARs, TAFs, and other pilot weather resources. Select the station relevant to your mission, then read the coded report alongside any decoder output. A decoder can clarify unfamiliar groups, but the source report preserves their sequence and context. Compare the two to become more familiar with the format instead of relying only on a plain-language summary.
- Use METAR and TAF for drone pilots as inputs to a broader site assessment, not as a complete picture of every hazard. Reports can help identify weather around an airport, while local observations show what’s happening at the launch point. Review available weather information for precipitation, changing visibility, turbulence, or icing, and assess nearby obstacles that could affect the operation. Base the final decision on the actual site and mission.
Wind, gust, visibility, ceiling, and temperature
Decode each METAR group into a condition you can compare with your aircraft and flight plan. Wind, visibility, cloud layers, temperature, dew point, and pressure each provide different operational context.
-
Decode Wind, Gusts, Visibility, and Clouds
Start with the wind group: its first three digits show direction, followed by speed in knots. A gust appears when it exceeds steady wind by at least 10 knots. Compare the reported wind and gust with your aircraft’s rated maximum; operational guidance treats either reaching 80% of that maximum as a no-go threshold. Check gusts separately because they can make conditions less predictable than steady wind alone.
- Next, read visibility in statute miles and distinguish it from runway visual range, or RVR, reported in feet. In U.S. METARs, 10 statute miles is typically the maximum visibility shown. Don’t interpret that figure as a guarantee of clear conditions across your entire operating site. Use the report as an airport observation, then consider what the reported visibility means for your intended location and flight.
- Read cloud groups for both coverage and height. Codes describe amounts such as scattered, broken, or overcast, while the following digits give cloud height in hundreds of feet. A broken layer can define the ceiling, so identify its base rather than treating every cloud layer alike. Compare the cloud height with your planned operating altitude and required clearance. A higher cloud layer doesn’t remove a lower ceiling.
-
Read Temperature and Dew Point
Check the temperature and dew point together; U.S. METARs report both in Celsius. The code M05 means minus 5°C. A small gap between temperature and dew point can signal conditions that may change quickly and reduce visibility. For example, readings of 20°C and 19°C are close enough to warrant caution. Consider this alongside reported visibility, especially if your flight depends on consistent visual conditions.
- Use temperature to consider aircraft operating limits, not as an isolated go-or-no-go signal. The provided operational guidance advises caution below 0°C or above 35°C. Then read the altimeter setting, reported in inches of mercury in U.S. METARs, as pressure context. It complements the other weather groups but doesn’t replace assessing wind, visibility, or clouds. Keep the units straight: knots for wind, Celsius for temperature, statute miles for visibility, and inches of mercury for altimetry.
Reading METAR examples for drone operations
- Take one METAR and translate its groups in order, rather than scanning for a single reassuring number. For example, 10SM means visibility of 10 statute miles, while 18012KT reports wind from 180 degrees at 12 knots. BKN020 indicates broken clouds at 2,000 feet. Read these together: the report describes broad visibility, a southerly wind, and a broken cloud layer. Each condition has a different implication for the flight area and route.
- Use the wind direction to think through how your planned route meets the airflow. In 18012KT, 180 degrees indicates wind from the south, and 12 is its speed in knots. Compare that direction with the route’s orientation and exposed portions of the site. Then look for a gust group rather than assuming steady wind tells the whole story. A gust can create a more demanding moment than the steady value suggests.
- Interpret gusts as a separate part of the example, not as extra digits to ignore. A METAR gust is reported when it exceeds steady wind speed by at least 10 knots. For instance, winds gusting to 25 knots are approximately 29 miles per hour. Consider what that peak could mean during launch, turns, and recovery. The strongest gust may matter more than the average feel at the takeoff point.
- Translate cloud codes into a vertical picture before planning the flight. BKN020 means broken clouds at 2,000 feet, with “broken” describing cloud coverage and the digits giving height in hundreds of feet. Compare that layer with the intended operating area and the required cloud clearance. A code describes conditions at the reporting station, so inspect the sky at your actual operating location as well.
- Finish by combining the fields into a decision, not reading each code in isolation. In the example, 10SM, 18012KT, and BKN020 describe visibility, wind, and cloud conditions together. Ask whether the wind exposure suits the aircraft and route, whether the cloud layer leaves the needed clearance, and whether local visibility matches the report. If any condition changes the plan, adjust the route or timing before launch.
AINautics University: Part 107 Training
AINautics University helps learners build the knowledge to interpret aviation weather and prepare for Part 107 certification. If METAR and TAF codes still feel difficult to turn into sound flight-planning decisions, its Part 107 Training can support a more structured understanding of the rules and weather concepts pilots study.
AINautics University offers self-paced certification courses for learners who want to study at their own pace, along with UAS Student Scholars programs for high schools and a Train-the-Teacher program for educators bringing UAS topics into the classroom. Its VR Trailer Mobile Lab provides another format for drone education. These options support different goals, from individual certification preparation to teaching and student learning.
To continue building your drone knowledge, contact AINautics University or visit ainauticsuniversity.com.
Turn Weather Knowledge Into Flight-Planning Skill
Weather interpretation is most useful as part of a consistent decision-making routine. For METAR and TAF for drone pilots, apply what you’ve learned to new reports and flight scenarios. This builds the judgment to recognize when conditions call for a revised plan.
AINautics University supports that learning through Part 107 Training, the Train-the-Teacher Program, and the VR Trailer Mobile Lab. These offerings connect certification learning with educator preparation and immersive UAS education. Whether you’re developing your own aviation knowledge or bringing drone learning into a classroom, keep building skills that support thoughtful, prepared operations.
Contact AINautics University today to explore a next step in your drone education. Keep learning, keep sharpening your decisions, and move forward with confidence.
Frequently Asked Questions
METAR vs TAF: What’s the Difference?
A METAR reports observed weather, while a TAF forecasts expected conditions. Use the METAR to understand what the reporting station observed, then compare the TAF with your planned flight period. For example, the latest observation may look suitable while a later forecast period shows worsening weather. Reading the reports together helps you plan for both current conditions and changes that could affect the mission.
How often is a METAR updated?
METARs are usually issued hourly, and unscheduled observations may appear when weather changes unusually or rapidly. Check the report’s timestamp before using it to assess a flight. The timestamp uses Zulu, or UTC, time, so convert it to the time reference in your schedule. A report may be nearly an hour old before the next routine observation, so check local conditions as well.
What Does “60,000” Mean in a METAR?
In the cloud-height code described here, 60000 indicates clouds at or above 60,000 feet. Don’t confuse that value with a cloud base near a typical drone operating height. Decode the entire cloud group, including its coverage letters, because the number alone doesn’t tell you whether the layer is few, scattered, broken, or overcast. Read lower cloud groups separately when the report includes them.
What is a METAR and what weather information does it report?
A METAR is a coded weather observation at an airport reporting station. Its groups can report wind, visibility, present weather, cloud coverage and height, temperature, dew point, and altimeter setting. In U.S. reports, visibility is given in statute miles, wind speed in knots, and temperature and dew point in Celsius. Decode each group in order, then consider which conditions matter most for your location and flight plan.
What is a TAF and how does it differ from a METAR?
A TAF is an airport-area forecast, while a METAR records observed conditions. TAFs are typically updated four times a day and are valid for 24 to 30 hours. They include forecast groups for wind, visibility, weather, and clouds. Use a TAF to plan for conditions expected during a mission; use a METAR to compare that forecast with observed weather at the reporting station.
How can drone pilots interpret TAF forecasts and valid-time periods?
First, match the TAF’s forecast period to your planned flight time. Then read each change group by its stated time window, rather than assuming the opening conditions last throughout the forecast. For example, a forecast period may run from 1500 UTC on one day to 1500 UTC the next. Compare relevant wind, visibility, weather, and cloud groups with launch, flight, and recovery times.
Where can U.S. drone pilots find official METAR and TAF reports?
The Aviation Weather Center provides METARs, TAFs, and other pilot weather resources. Select the reporting station relevant to your operating area, then check the observation time and forecast period before interpreting the codes. Decoder tools can make groups easier to read, but compare them with the original report. Airport reports describe conditions at their reporting location, so they may not capture every local condition at a drone launch site.
How do METAR and TAF weather conditions affect FAA Part 107 drone operations?
They help pilots assess whether weather conditions support a planned operation, but the reports don’t replace site-level judgment. According to the Federal Aviation Administration, Part 107 operations require at least 3 statute miles of visibility; §107.51 requires operators to remain at least 500 feet below clouds and 2,000 feet horizontally from clouds. Compare forecast and observed conditions with your route, then account for changes across the mission.

Article by
AINautics University Team
The team behind AINautics University, dedicated to drone education and FAA Part 107 certification prep, VR flight simulation, and STEM training programs for students and educators.


